ColdFusion is a Rapid Application Development language, meaning that it allows developers to write powerful applications of any scale or magnitude with relative ease, and provides us the ability to code quickly and easily using relatively simple tag and script syntax to produce and perform some incredibly powerful tasks.
The speed and rapid elements of Coldfusion development also means that (theoretically) we are able to deliver end products to our customers with more ease and less issues - I choose the word 'theoretically' as there is always nine times out of ten an issue or two that arise to slow things down, whether it's a code issue or client-related enquiries.
Regardless, typically we are able to work faster, smarter and harder with ColdFusion, which means we may be able to finish projects on time if not earlier.
Does this mean more time at the pub after work as all projects have been completed? Perhaps more time with the family? However you choose to spend your 'earnt' hours, you HAVE earnt them.
Gaining more time
Building on top of what is already an astonishingly quickly language within which to develop, there are more ways a ColdFusion developer can enhance their development performance and optimise their time.
Through the use of code snippets, you can easily reduce the repetition of some of the common tasks when developing your applications or writing code.
What are snippets?
I'll tell you.
Go on then...
Snippets are code segments that can be written, customised and added into your application code.
ColdFusion Builder has a built-in snippet panel which lets you add your code snippets, edit them and insert them into the editor with ease. To access the panel in your workspace, you can do either one of the following:
- Window -> Show View -> Snippets
- Window -> Show View -> Other... -> ColdFusion -> Snippets
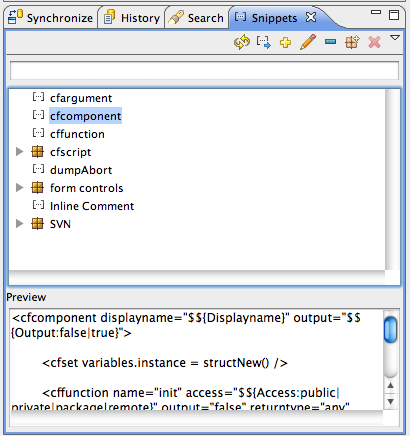
IDE's typically have some sort of toolbar with shortcuts to commonly used tags and functions, perhaps a wizard to help you fill out some of the attribute options to help you populate the tags before inserting them into the code editor.
Snippets are the same thing, although they are custom-written; YOU have the ability to write your own snippets of code, customise them for your own needs and requirements and format them to suit your preferences.
Example
You may want to debug your application and view the information sent in a FORM submission.
You'd probably type in the cfdump tag with the var attribute, then follow with a cfabort tag to halt further page processing.
With snippets, you can create a custom block of code containing those tags and information - you'd only have to write it once, and you could call it and insert it into your code using a simple keystroke shortcut.
Already, you have removed the necessity to duplicate code every time you need to run a dump and abort process, instantly saving you time.
Let's create this snippet now
- Open up the snippet panel in ColdFusion Builder
- Click the 'Create A New Snippet' icon (the yellow 'plus' sign)
- You will be provided with a snippet wizard dialog box to assist you and make your life easier than it already is
These options are:
- Name: The name of the snippet
- Trigger Text: The text used with the keyboard shortcut to invoke the snippet
- Start Block: The code segment you wish to invoke
- End Block: Optional code to insert after the Start Block
To create the cfdump / cfabort tag combination snippet, let's enter in the following details:
- Name: dumpAbort
- Trigger: dumpAbort
- Description: I create a cfdump followed by a cfabort tag
The code was added in to the Start Block input option, and the result can be seen below:
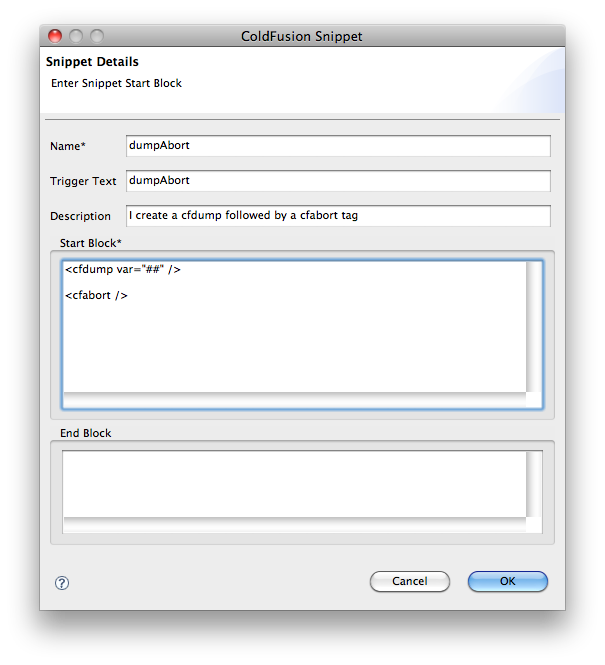
Awesome. Right? As we have provided a trigger text for the snippet, once saved we could invoke and insert it into the currently open document by typing in 'dumpAbort' and pressing the 'cmd + J' key combination ('Ctrl + J' on a PC) or by double-clicking on the snippet in the Snippet Panel.
This block would work, but we'd still have to manually edit the code after insertion to add in the value of the var attribute to dump out our SCOPE/object.
Adding Values
Thankfully, we have the ability to force the snippet to prompt us to enter in information before the code is inserted in to the editor.
This is achieved by using the $${ ... } notation to mark a placeholder for variables to be included into the snippet.
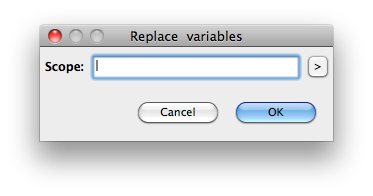
We could add the $${Scope} inside the snippet block for the var attribute, which would prompt the wizard to create a dialog asking with a text field asking for the value of the Scope variable to be added:
Another alternative is to provide a list of values for the snippet placeholder variable, like so:
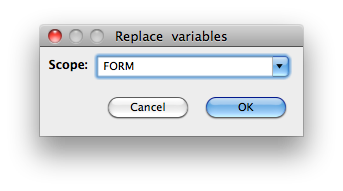
<cfdump var="#$${Scope:FORM|URL|SESSION|Application}#" />
The options you wish to provide are separated with a pipe (|) and written inside the $${} placeholder parenthesis.
This will create a drop down box with the values, and the selected value will be inserted in place of the $$( ... ) snippet variable:
After selecting a value, the code is then inserted directly into the editor at the current position of the cursor:

Instantly, we have created, adapted and customised a snippet, which when populated with either free-text or a value from a list of pre-defined values, will insert directly into the editor.
Goodbye repetitive typing, hello completed projects, happy clients and good times.
System Variables
Another benefit of using snippets is their ability to automatically populate 'system variables'.
The following is a list of reserved variables that the Snippets system will pre-populate for you upon insertion:
- $${DATE}
- $${MONTH}
- $${TIME}
- $${DATETIME}
- $${CURRENTFILE} – Current file name (just the file)
- $${CURRENTFOLDER} – Current folder (The path to the containing folder)
- $${CURRENTPATH} – Current path (full file name)
- $${CURRENTPRJPATH} – Just the folder
- $${USERNAME} – Current user
- $${MONTHNUMBER} – Month as a number
- $${DAYOFMONTH} – Day of month as a number
- $${DAYOFWEEKNUMBER} – Day of week (the week starts on Sunday)
- $${DATETIME24} – DateTime24 – a 24 hour clock version of datetime.
- $${YEAR} – Current year.
- $${YEAR2DIGIT} – Current two digit year.
These are ideal timesavers and a superb way to populate dynamic data without having to type within the wizard.
Consider this example where we can create an inline CFML comment block:
<!--- $${ Comment Title:FIX|TODO|ENHANCEMENT}
      $${DAYOFMONTH}.$${MONTHNUMBER}.$${YEAR2DIGIT}
      $${TIME} $${USERNAME}: $${Description} --->
Only two variables here require any user-input from the wizard;
- Comment Title - a drop down selection list
- Description - a free text entry for the comment
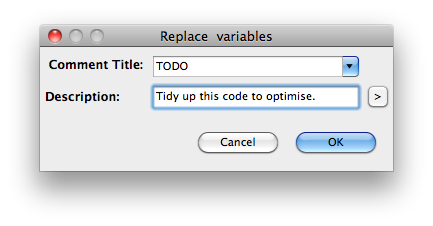
The remaining values will be automatically added to the snippet when the code is inserted into the editor. Confirming the above screen will produce output similar to as shown below:

More samples for you
I've been using snippets as much as I can over the last few months, and I have certainly noticed a reduction in time-spent on repetitive tasks and duplicate coding.
The benefit of using snippets is certainly one that can be noticed.
Below are a few of the snippets that I have created and use/have used. I'm adding them here so that others may use them, and save even more time by not having to write the snippets out themselves - hey, i'm nice like that.
You may notice that some of the snippets could be better optimised by including more select options here and there.. if you wish to change these to suit your needs, please feel free; that is why they have been added here.
Use them, love them, and if they save you some minutes coding, remember that minutes lead to hours... and if you end up hours ahead on your project, remember the monkeh and buy me a beer.
cfcomponent snippet (with init method)
In the component snippet, I ad written this to create not only the component tags but also the pseudo-constructor and the init method function tag blocks.
Notice the snippet placeholder $${Displayname} is used twice here; firstly in the displayname attribute of the cfcomponent tag, then in the hint attribute of the init function. The wizard only prompts for this variable once, and will use the value in every instance of the placeholder within the snippet.
<cfcomponent
        displayname="$${Displayname}"
        output="$${Output:false|true}">

	<cfset variables.instance = structNew() />

	<cffunction name="init"
                access="$${Access:public|private|package|remote}"
                output="false"
                returntype="any"
                hint="I am the constructor method
                        for the $${Displayname} Class.">

		<cfreturn this />
	</cffunction>

</cfcomponent>
cffunction snippet
<cffunction name="$${Name}"
        access="$${Access:public|private|package|remote}"
        output="$${Output:false|true}" hint="$${Hint}">

</cffunction>
cfargument snippet
<cfargument name="$${ParamName}"
        required="$${Required:true|false}"
        type="$${Type:String|Numeric|Boolean|XML|Any}" hint="$${Hint}" />

