This is a post I've had stored in my blog drafts since ColdFusion Builder was first released in Beta. I apologise, I should have had it posted by now.
ColdFusion developers the world over have been asking Adobe for a ColdFusion specific IDE for some time now, and Adobe responded accordingly with ColdFusion Builder (originally codenamed 'Bolt' for those who didn't know).
A dedicated IDE catering for CF needs, ColdFusion Builder (although still in Beta) has proven to be a fantastic resource for development. Built to use the already superb Eclipse IDE (which most developers are either aware of or use) CF Builder has opened up the possibilities and options available when developing ColdFusion applications.
There are two ways you can install ColdFusion Builder:
- As a standalone development product
- As a plugin to be used in an existing Eclipse installation
You can download ColdFusion Builder (currently Beta 3) from the Adobe Labs site.
I typically use the plugin option - I have Eclipse already installed with my SVN respositories, Subclipse, Flex Builder plugin and more, and so for me the addition of one more plugin not only simplifies my workspace, layout and time-management, but also ensures I only have one place to go for any of my development requirements.
In this tutorial, I'll guide you through setting up a ColdFusion server instance within CF Builder, allowing the developer to access and manage the server and the ColdFusion administrator from within the IDE, and also creating a new ColdFusion project, mapping to the server to allow for real-time CF output within the workspace. Let's get started!
Open up the Server view
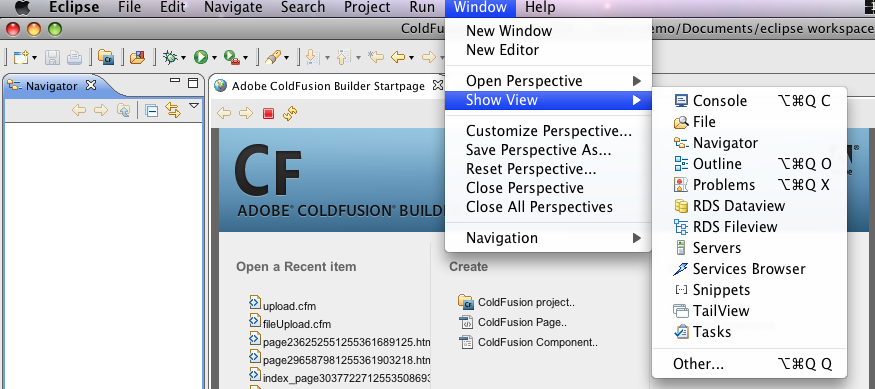
In the Eclipse/ColdFusion Builder menu, go to Window > Show View > Servers.
This will open up the Servers tab (as shown in the next screenshot). A major benefit of using an Eclipse-based IDE is that the panels and windows can be moved around the workspace, allowing you to to customise your screen space and optimise how you like to work.
Feel free to drag the panel around the workspace to a position that best suits you. Alternatively, you can always minimise and maximise them as and when you choose.
Adding a Server
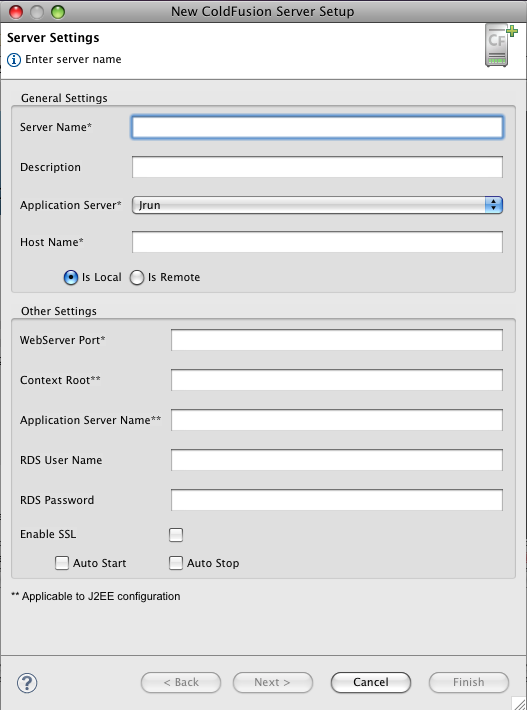
Let's add a ColdFusion server to the Server panel. Click on the first icon in the toolbar menu (at the top of the panel), and select 'Connect to ColdFusion Server', which will open up the 'New ColdFusion Server Setup' dialog window.
From this window, we start the near effortless task of adding a server to the workspace. Let's run through the steps and details for each entry.
General Settings
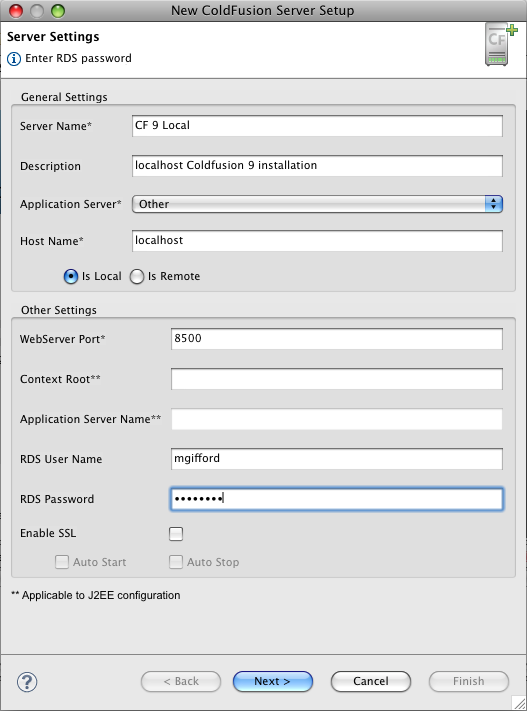
- Server Name: The ColdFusion server name. (eg mattgifford)
- Description: Enter a description of the server. I typically write the server name, local or remote, and version of ColdFusion (eg mattgifford local CF9)
-
Application Server: If you are using a JRun installation, select JRun. If you are using the built-in development server or any other server, select 'Other' from the dropdown. ColdFusion Builder allows you to start, stop or restart your server if it is a JRun instance (once the server has been added). This option will not be available if you do not use a JRun instance.
- Host Name: The name of the ColdFusion server host. For example, localhost, 127.0.0.1 or perhaps dev.mattgifford.co.uk (if using virtual hosts in an apache setup, for example).
- Ensure the 'Is Local' option is selected, as at this point we are only adding local servers.
Other Settings
- Webserver Port: Specify the port number of the ColdFusion server instance you are configuring. By default, the port number is 8500.
- Context root: (applicable only for JRun servers with J2EE configuration) Enter the context root. The J2EE environment supports multiple, isolated web applications running in a server instance. Hence, J2EE web applications running in a server are each rooted at a unique base URL, called a context root (or context path). For example, '/cfusion' or '/' if the context root was cleared during JRun installation.
- Application Server Name: (applicable only for JRun servers with J2EE configuration) Name of the JRun Server on which ColdFusion is deployed. This will relate the server name in the JRun Management Console.
- RDS User Name: If you are using RDS, specify the RDS user name.
- RDS Password: Specify the RDS password.
Note: You set the RDS password in the ColdFusion Administrator. The RDS password is not the same as the ColdFusion aministrator password.
- Select the Enable SSL option to enable SSL support in ColdFusion Builder. Servers registered in the Server Manager can communicate using SSL.
- Select Auto Start and Auto Stop options to automatically start and stop the ColdFusion server every time you launch and exit ColdFusion Builder.
Click Next to proceed.
Local Server Settings
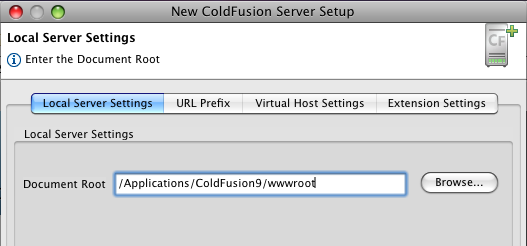
Select the Local Server Settings tab, and specify the following local server settings, as applicable.
- Server Home: (applicable only for JRun servers) Browse and select the ColdFusion Server home directory. For example, C:/ColdFusion9/ for a standalone ColdFusion server instance. For a multiserver instance, the server home is the Application Server Home directory, for example, C:\JRun4 for a JRun-J2EE or multiserver configuration.
- Document Root: Browse and select the webroot location. If ColdFusion is configured with a web server, say IIS, then select the document root of the web server; for example, c:\inetpub\wwwroot.This setting is required for previewing, debugging, and CFC name resolution in ColdFusion Builder.
- Version: (applicable only for JRun servers) Select the ColdFusion server version from the Version drop-down list.
- Windows Service: (applicable only for JRun servers) The Windows Service option is available only for standalone and multi-server configurations, and not J2EE configuration. If you want to start and stop the ColdFusion server using the Windows Service, select Use Windows Service To Start/Stop Server.
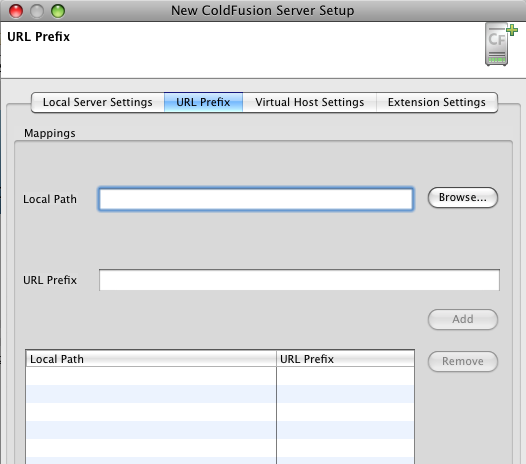
URL Prefix
This task is optional. You don’t necessarily have to specify a URL when creating a server. You can specify a URL prefix even after creating the server by editing the server settings in the Servers view.
Select the URL Prefix tab and enter the following details:
Virtual Host Settings
This is an option. You do not need to specify any virtual host details in ColdFusion Builder when setting up your server.
If you do supply virtual host information, please be aware that ColdFusion Builder does not validate these settings. Therefore, if you enter details here that do not match those set up on your web server, ColdFusion Builder will not inform you of any errors.
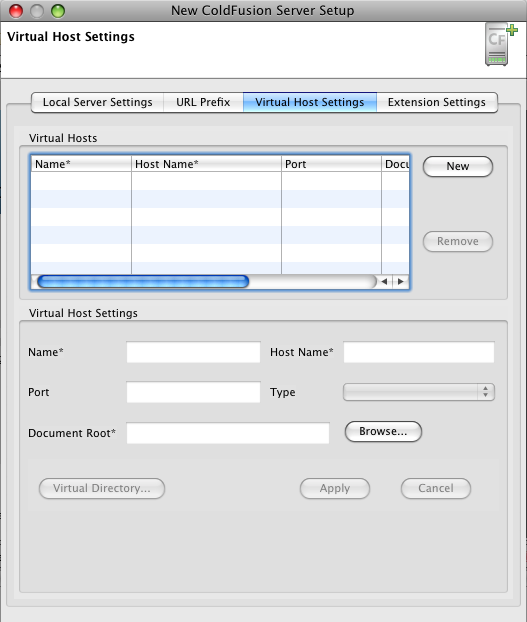
To configure a virtual host, select the Virtual Host Settings tab, and do the following:
- Click New and enter the following details in Virtual Host Settings section.
-
Name: Specify a name for the virtual host. For example, vhost1. You can provide any name and not necessarily the name that you provide in the web server.
- Host Name: The virtual host name as specified in your IIS or Apache web server settings. For example, dev.mattgifford.co.uk. When you create a virtual host in ColdFusion Builder, the virtual host uses a naming convention server name-virtual host name. The Server drop-down list in Project properties displays the virtual host name using this naming convention. For example, if you created a virtual host named "vhost1" in your ColdFusion server (localhost), the naming convention that ColdFusion Builder uses to identify the virtual host is "localhost-vhost1".
- Port: The port assigned to the virtual host in the web server.
- Type: Select HTTP or HTTPS from the drop-down list.
- Document Root: Browse to or enter the home directory of the virtual host.For example, if my website dev.mattgifford.co.uk is mapped to the directory C:\websites\mattgifford on the Apache web server, enter C:\websites\mattgifford as the home directory.
- Click Add.
-
- To create a virtual directory, click Virtual Directory and enter the following details.
- Alias: Specify an alias for the folder path.
- Location: Browse to or enter the folder path to which you want to specify an alias.For example, if the document root of your website (dev.mattgifford.co.uk) is C:\websites\mattgifford, and you want to include images from a folder available on d:\monkehImages\images. Then, you can define an alias called "images" for the folder path "d:\monkehImages\images".
- Click Add.
- Click OK to add the virtual directory to the Virtual Directory Settings table.
- Click Apply. The virtual host is added to the List Virtual Hosts table.
To modify the virtual host settings, select the virtual host from the List Virtual Hosts table, modify the settings, and click Update.
Install Extensions
Select the Install Extensions option to install the extensions that are packaged with ColdFusion Builder.
- Select the ColdFusion server on which you want to install the extension.
- Browse and select the ColdFusion webroot location.
- Browser to a location within the webroot to install the extensions. The extensions are installed in the Extensions directory within the selected location.
Click Finish to create the ColdFusion local server instance.
All done!
You can see from the screenshot below, the server is now added to the Server panel.
The following information is directly available to view from this datagrid:
- ServerName
- Status (Running or Stopped)
- Description
- Type (Local or Remote)
- Host
- Port
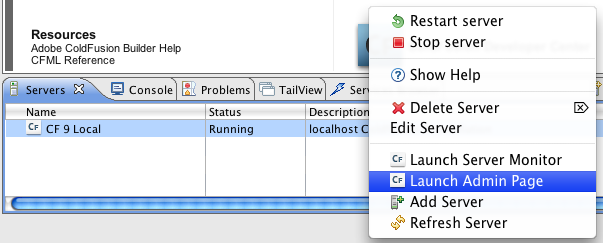
Each entry into the Server panel has a context menu, accessible by right-clicking on a server entry. Options available include Start, Stop and Restart the server (JRun and J2EE only), Edit and Delete, Server Monitor and Admin Page. I personally think that having the ability to directly control and manage your servers from within your development workspace is a massive time saver.
No need to open up Terminal, Windows Services or the JRun Management Console to start/stop a server instance. You don't have to leave your screen to do this (except to make a coffee, which you can do now if you'd like?)
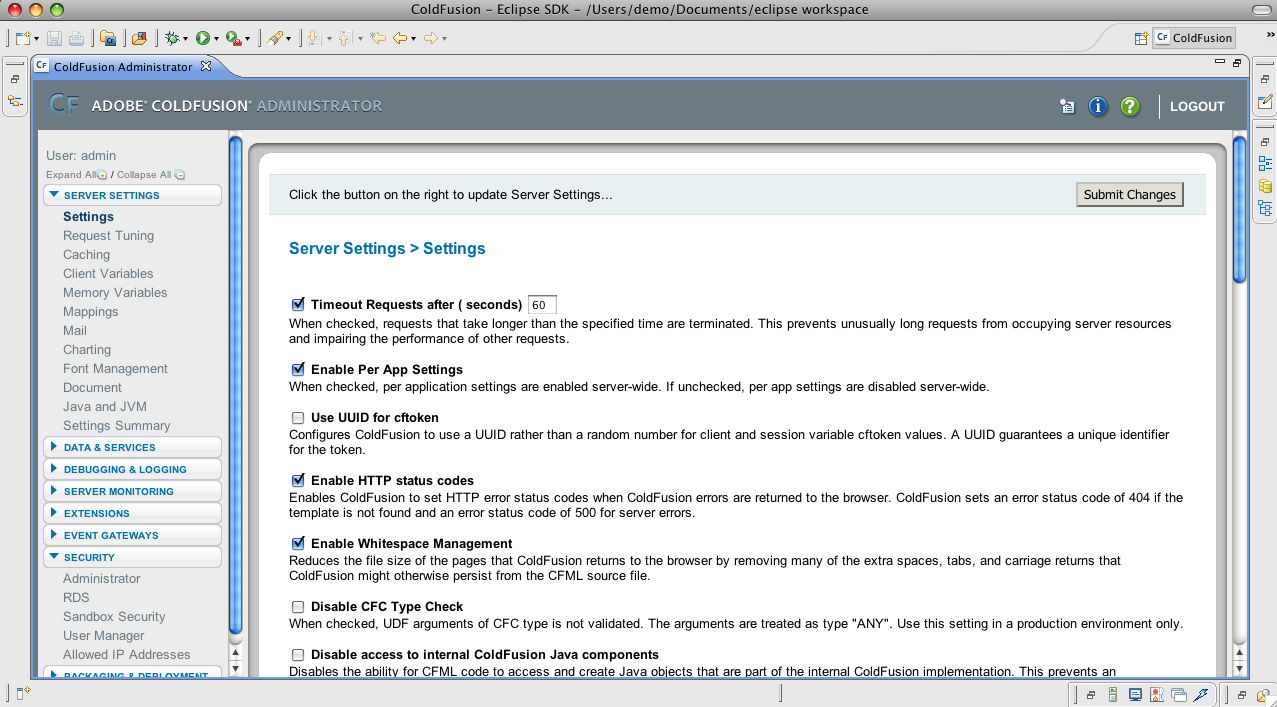
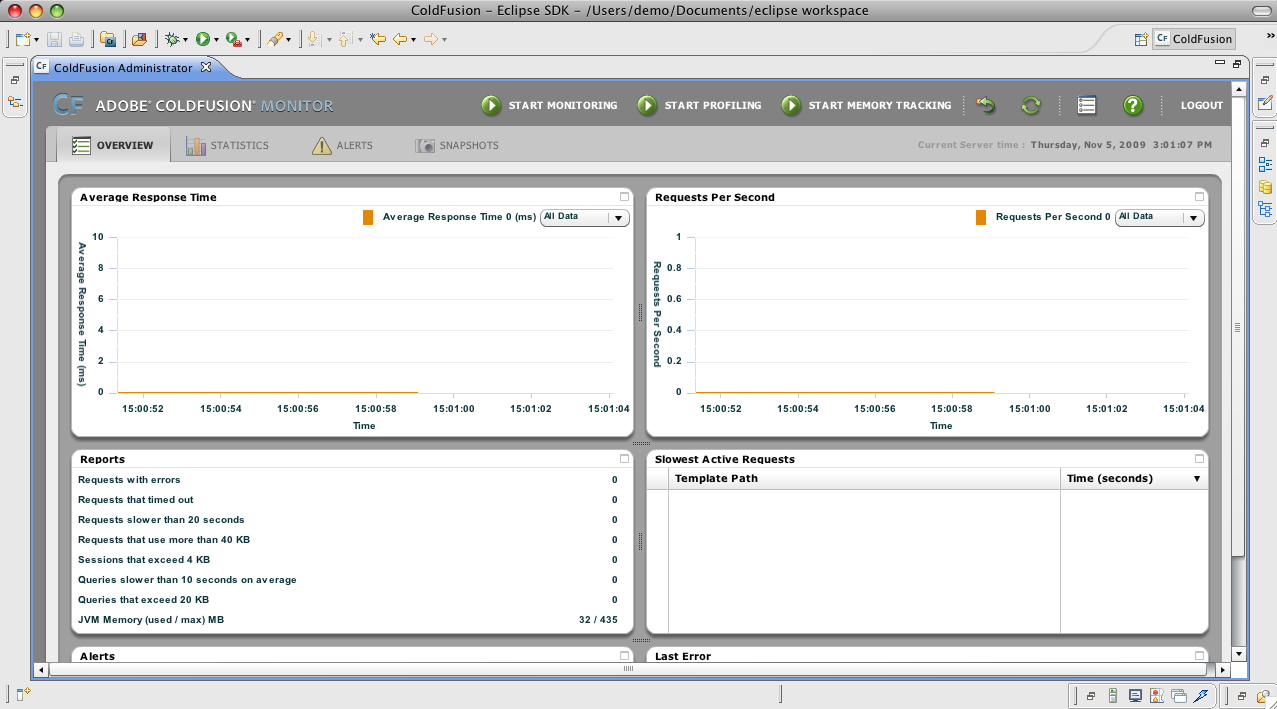
Let's open up the ColdFusion Administrator by selecting 'Launch Admin Page' from the context menu. The Admin page will load up in a new tab inside the Eclipse IDE workspace. Awesome!
You will be asked to log in as normal. You can now manage and configure your admin settings. No need to open up a new browser tab or window, or move to a different application to do this. You don't have to leave the workspace.
The same can be achieved with the Server Monitor ('Launch Server Monitor' from the context menu). This will also load up in a new tab in the workspace. This might be just me, but I hope I'm not the only one that thinks this is immense! Once again, you can monitor and control your server without (all together now) "leaving your workspace".
Create a new ColdFusion project
Ok, we now have our local ColdFusion server set up within ColdFusion Builder. Let's add a project to the IDE which uses that server.
Enter project information
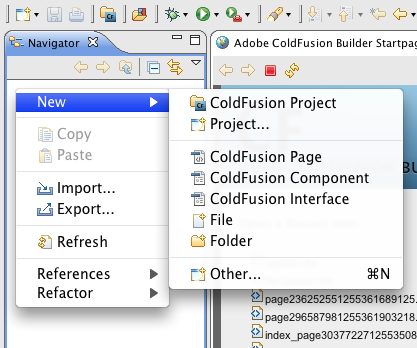
- Right-click in the Navigator area and click New > ColdFusion Project.
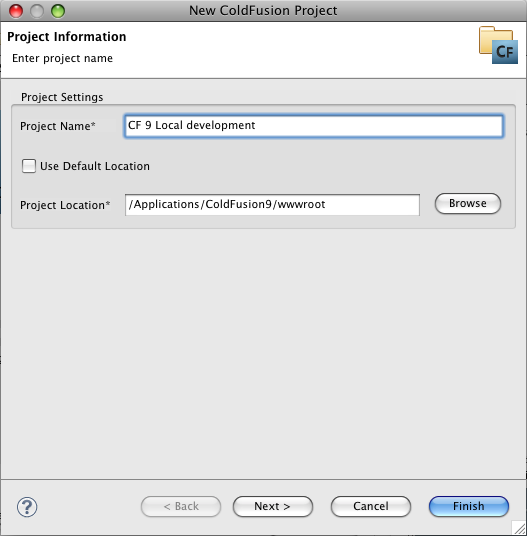
- In the Project Builder wizard, specify the project name.
- To change the default project location, deselect the Use Default Location option. As we are going to use the webroot of the ColdFusion server/instance we have just added, change the project location to point to that webroot.
- Click Next to specify the ColdFusion server details.
Enter server details
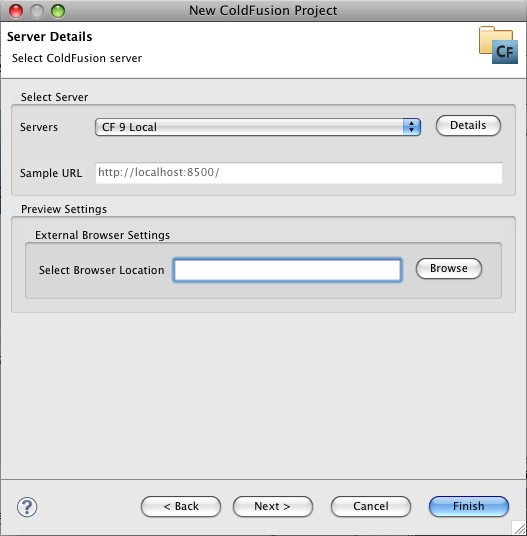
- Select the server from the Server pop-up menu. Here, we can see the CF 9 Local server that was added in the earlier steps.
Note: If the project is in the server web root, then the Sample URL box is automatically populated with the server URL. For example, http://127.0.0.1:8500/eval, where 127.0.0.1 is the server host, 8500 is the port number, and eval is the project name.
- Specify your preview settings to use an external web browser by browsing and selecting the select the web browser executable. The internal browsers are selected, by default.
- Click Next.
Add existing sources
- In this step, you can:
- Link existing resources folder to the project.
- Select previously configured applications, such as Model Glue, with the current project.
- Click Add to select the folder to link to the project.
- Click Finish to build a new ColdFusion project.
Complete!
Further information
- ColdFusion Builder on Adobe Labs
- Understanding virtual hosts, and relevance in the ColdFusion Builder context
- Virtual directories
- Using Extensions


